Posted on Leave a comment

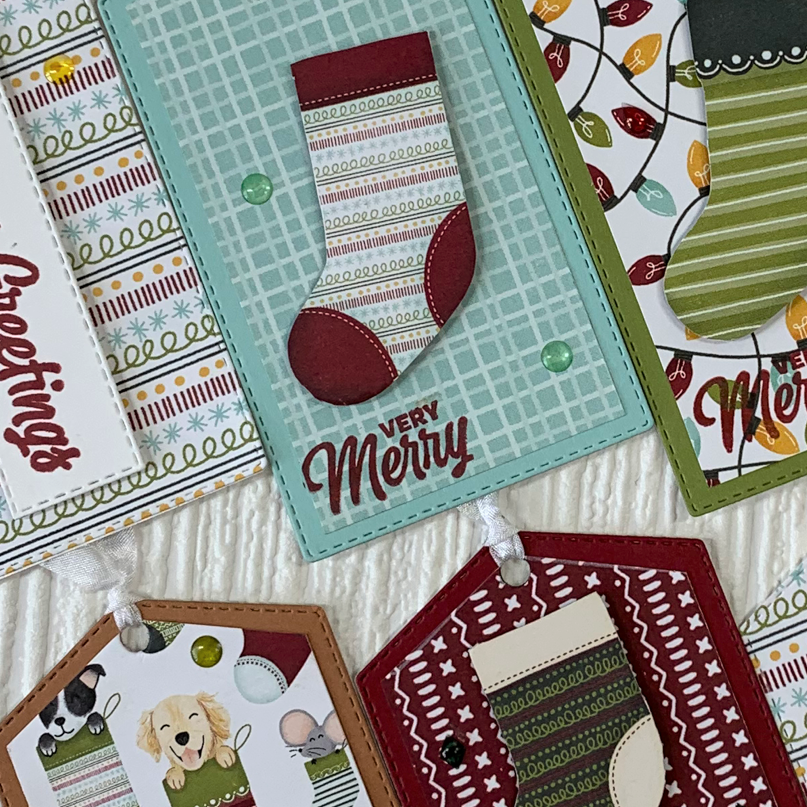
IT’S TIME FOR SOME CHRISTMAS GIFT TAGS

Well, I was so caught up in my Coffee & Card class and making Christmas gift tags, I totally forgot to share a post with you yesterday.

I wanted to use the Sweet Stockings Suite to make Christmas gift tags and a coordinating gift box.

The gift box was inspired by Julie DiMatteo’s design for a reinforced gift box. I will be making this Thursday during my Facebook Live if you want to see how to make it.

The box base was made with a piece of Bumblebee card stock and the lid uses one of the designs from the Sweet Stockings 12″x 12″ Designer Series Paper.

The tag, which I also used for all the gift tags in the box, was cut using the tag from the Stockings Dies.

I used the Sweet Little Stockings Stamp Set for the Christmas greeting and the gift boxes. The boxes were stamped onto the tag as well as some scrap card stock. These extra boxes were fussy cut and popped up using Stampin’ Dimensionals.

The diamond shaled silver Epoxy Essentials were coloured using the dark Evening Evergreen Stampin’ Blend and added to each of the boxes.

The star die, from the Stocking Dies, was used to cut three Evenng Evergreen stars. I added some of the black Cute Star Sequins to the centre of each star. Using half a Mini Stampin’ Dimensional, I added the stars to the top of the box.

I punched a small hole at the top of the tag before threading some Bumblebee 2020 – 2022 In Colour Ribbon through the tag. The tag was then popped up with dimensionals and the ribbon wrapped and tied into a bow.

When the bow is untied the gift tags are revealed.

There are eight gift tags in total and they all have a Basic White backing with ‘to’ and ‘from’ stamped in coordinating colours.

I fussy cut each of the stockings that I chose from the DSP. The Whisper White Crinkled Seam Binding Ribbon was threaded through the top of each tag.

I used the Clear & Silver Epoxy Essentials to add some coloured shimmer to the tags.

I really like the colour combination in this suite and the playful images and ‘pawfect’ sentiments.

What is your favourite Christmas product in the July – December 2021 Mini Catalogue?

Until next time, happy stamping.

If you live in Australia, you can order any of the products I used to make this card by going to my online store. Just click on any of the images below.

Product List
Paper Snips
[103579]
$17.00
Posted on Leave a comment

PINWHEEL TOWER GIFT BOX

Hello and welcome to today’s project post. Thanks for popping by.

I decided to make another Pinwheel Tower Gift Box. For this one, I chose the Sweet Stockings Suite to decorate it.

This gift box will be filled with treats for my brother’s two Blue Heeler dogs, Rudy and Bosch (my fur ‘nephews’).

I have lots and lots of photos to show you all aspects of this gift box card. At the core of the card is a 1-1/2″x 4-1/4″ ‘tower’. Then, four 3″x 4-1/4″ panels are adhered to each of the four sides of the ‘tower’. I used four different coordinating colours for the pinwheel to match the Designer Series Paper.

When the card lies flat, you can see three different cardstock colours.

The first panel features the very cute “Santa Paws is coming to town”. This was stamped in Cherry Cobbler ink onto Basic White cardstock and cut with one of the Tailor Made Tags Dies. I tied some Basic Black and Basic White twine, from the Baker’s Twine Essentials Pack, through the tag opening.

The second panel features Christmas stockings DSP. The larger panel has a gift card holder.

On the narrower side panel I added the stamped, coloured and die/fussy cut stocking and dog. I used a photo of Bosch to try to colour the stamped image to look like him – and, it’s a pretty close resemblance.

The third panel features the Christmas lights design and a pocket for the gift tag. The tag was cut using one of the Tailor Made Tags Dies and was stamped using with to/from from the Banner Year Stamp Set. I threaded a length of Bumblebee 2020 – 2022 In Colour Ribbon. and secured it by tying a bow with Basic White Baker’s Tine.

The narrow panel has a stocking that was cut from the DSP using the Stocking Dies. It also has three stamped, coloured and die cut candy canes.

The final panel has more stockings and some stamped, coloured and die cut Santa hats.

I am so pleased with the way my gift box adaption of the Pinwheel Tower Card has turned out.

Here are the instructions so you can try it yourself.

If you make one of the gift boxes I hope that share it with me.

Until tomorrow, happy stamping.

If you live in Australia, you can order any of the products I used to make this card by going to my online store. Just click on any of the images below.

Product List
Paper Snips
[103579]
$17.00
Posted on Leave a comment

#GDP302 – TIME FOR ANOTHER CHALLENGE

Hello and welcome! Thanks for popping by today to see my latest project. I am so pleased that you have.

This week it is time for a sketch challenge this week.

For this challenge I decided to make a Christmas in July card using the Whimsy & Wonder Suite.

I used one of the designs from the Whimsy & Wonder 12″x 12″ Designer Series Paper to cut the 10 1/2″ strips that I adhered to a layer of Blushing Bride cardstock. Then I wrapped and secured a length of Blushing Bride 3/8″ Frayed Grosgrain Ribbon across the decorated layer.

The Christmas greeting is from the Sweet Little Stockings Stamp Set and was stamped using Blushing Bride ink. After trimming the greeting down, I cut a slightly larger Blushing Bride layer. I attached a Wonderful Snowflake on top of the pink layer and then, used Stampin’ Dimensionals, to pop the greeting up.

I cut two additional strips of the DSP to place inside the card and down one side of the envelope. The final step was to place some Elegant Faceted Gems on the card front.

There are some totally gorgeous new products about to be available and I have used some of them on this card. In particular, the Frayed Grosgrain Ribbon is going to be a favourite.

The small gaps between each of the strips of DSP remind me of pattern making/drafting when I would cut a pattern piece into strips and split and spread it open. It has been such a long time since I did any pattern making.

Until tomorrow, happy stamping.

If you live in Australia, you can order any of the products I used to make this card by going to my online store. Just click on any of the images below.

Because some of the products I have used to make this card are not yet available to customers, I am not able to show them at this time. As soon as product images go live, I will create this section.

Product List
Paper Snips
[103579]
$17.00