Posted on Leave a comment

SCRAPBOOKING IS AN AMAZING WAY TO KEEP MEMORIES ALIVE

My paper crafting journey began with scrapbooking many years ago but after a while I moved on to card making. So it has been wonderful to bring this back into my crafting life.

Although I have had a few photobooks printed they don’t really allow you to record the memories that were made. You can share the memories with others when you take them through the book but if you’re not there to tell the story how will others know what the story is.

The photos I have included in these layouts are from our 2024 travels in the UK.

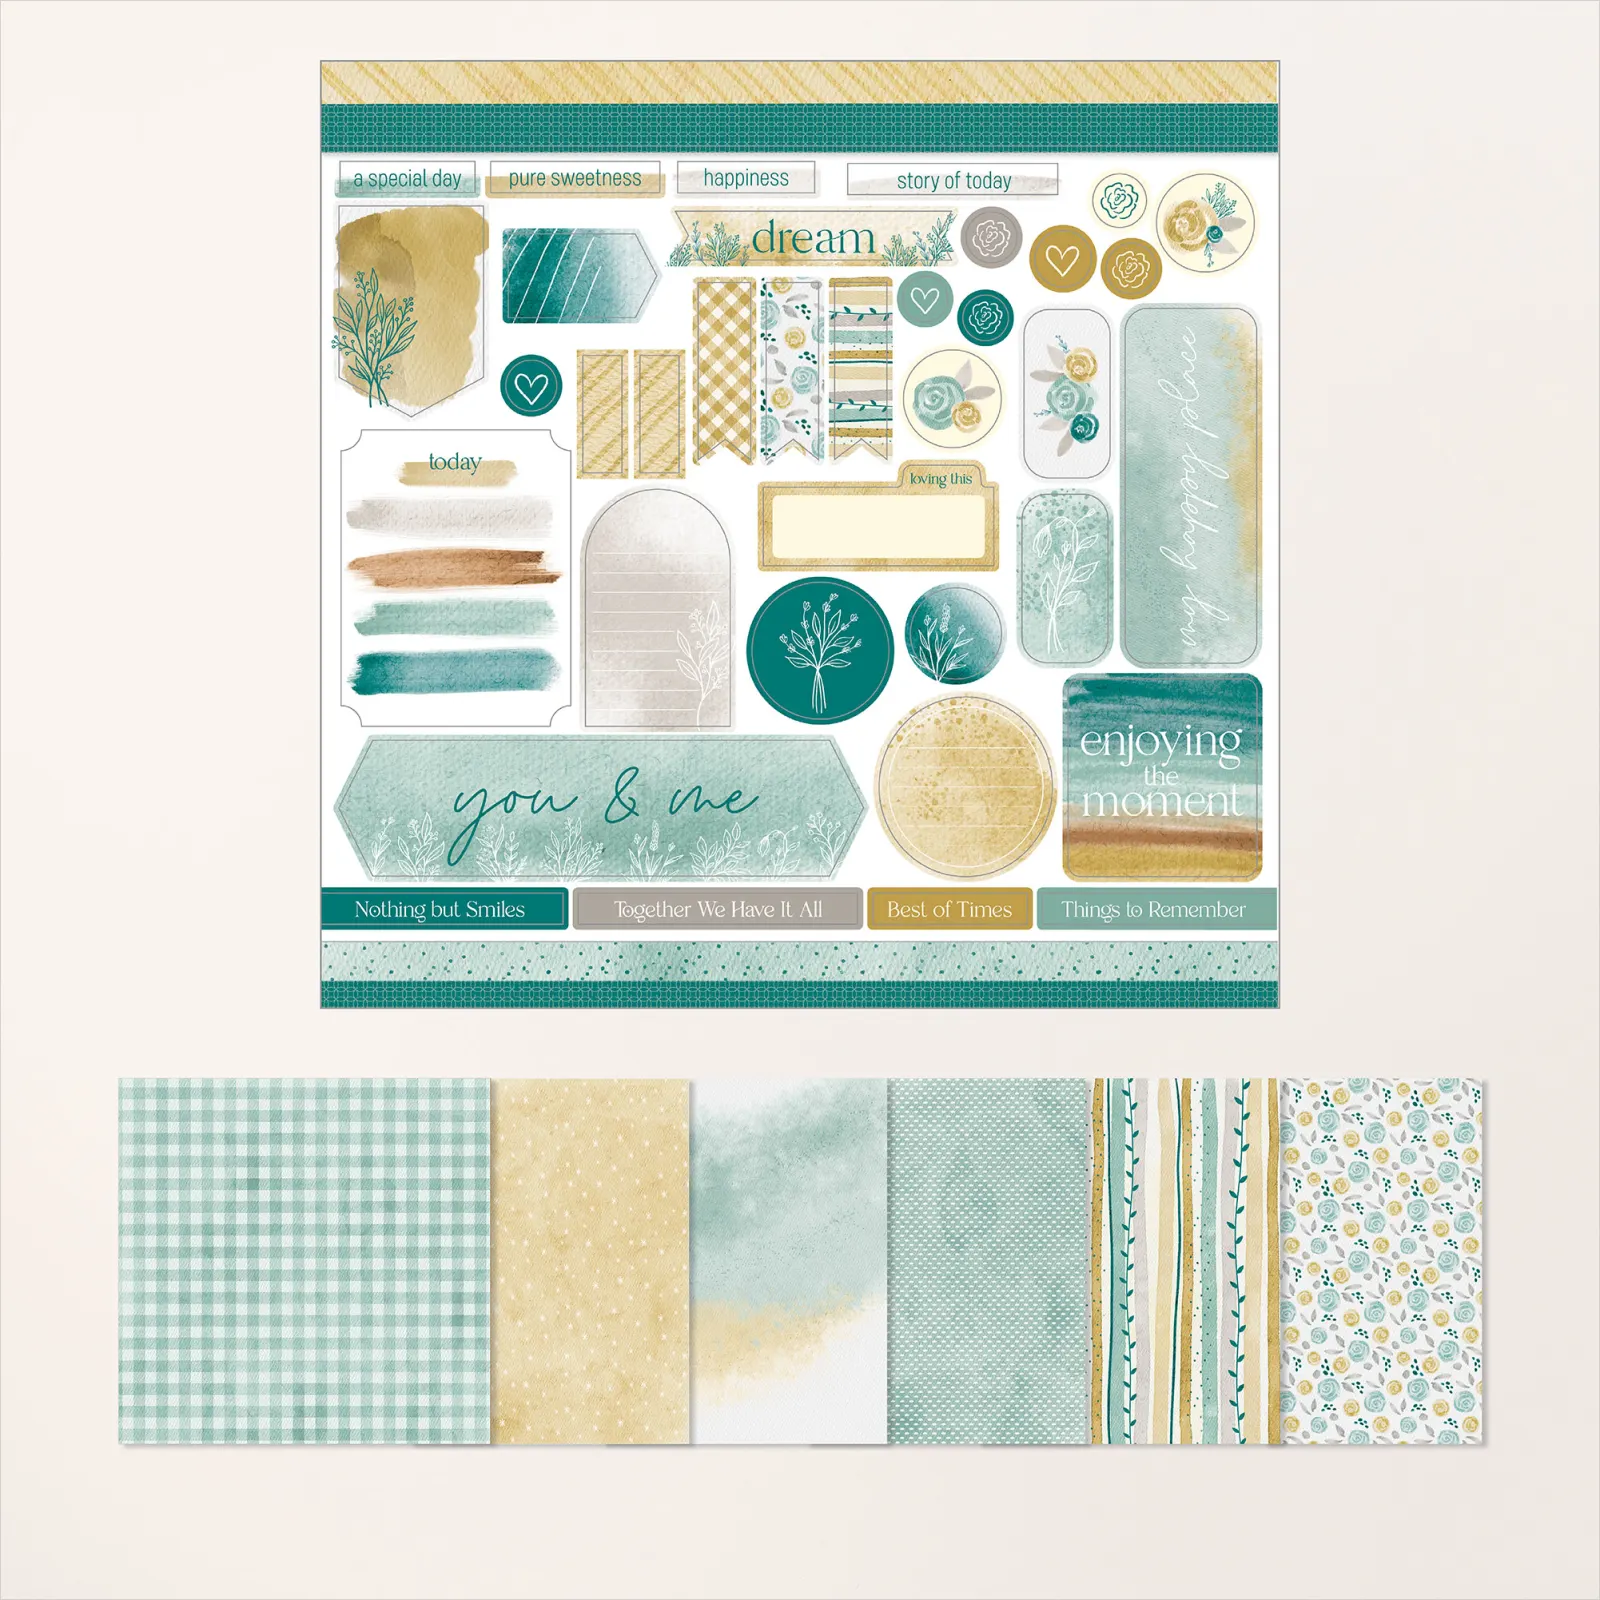
There are now several fantastic Scrapbooking Workshop Kits available. One of them is the Everyday You & Me Scrapbooking Workshop Kit pictured below. The Workshop Kit contains the paper products you need to make three double page layouts with very detailed cutting and assembly instructions.

I did not use this one but chose an ‘expansion’ pack to use.

The ‘expansion’ pack coordinates with the Workshop Kit. I chose this Everyday Happiness DSP & Sticker Sheet pack because I wanted to create my own layouts for the photos I chose to scrap.

The coordinating card stock I used were Lost Lagoon, Pretty Peacock and Wild Wheat. I used both A4 and 12″x 12″ sheets.

The Mini Alphabet Dies and Adhesive Sheets were perfect to create titles for the pages.

Adding stickers made decorating the pages so easy!.

Most of my first four layouts were single matted photos with a journaling panel.

Combing the Designer Series Paper and cardstock can create so many different layouts.

For my final layout I used the Flip Flaps to allow me to load up lots of photos to wrap up the story of our 4 weeks in the UK.

There are 10 photos set in Flip Flaps on the left hand banner and 12 on the right hand banner. There is also journaling set on each side.

The last two Flip Flaps on the right hand banner were popped into 3″x 4″ pockets because I had run out of 4″x 4″ flaps.

These layouts were so much fun to put together.

Next post, I will have some cards to share with you.

Until then, happy stamping.

If you live in Australia, you can order any of the products I used to make this card by going to my online store. Just click on any of the images below.

Product List
Paper Snips
[103579]
$21.00
Grid Paper
[130148]
$23.00
Posted on Leave a comment

I MADE SOME GREAT MEMORIES AT THE ONSTAGE EVENT

From 13th – 16th March, I had the most amazing time at the Stampin’ Up!® OnStage Event in Brisbane.

It was wonderful to catch up with so many of my demonstrator friends, meet other demonstrators, swap projects and be a volunteer in the Product Playground.

As a Stampin’ Up!® demonstrator, one of the significant benefits is being able to attend events like this … and, seeing the new Catalogue before anyone else … and being able to have an extra early pre-order.

At OnStage there are a wide range of elements in the agenda – presentations (creative and business related), break out sessions, make and takes and lots of opportunities to catch up. We also enjoyed a Welcome Party on the first night.

Swaps are a big part of the OnStage experience. I was so pleased to bring home so many great project ideas from other demonstrators. One of my best experiences is having made loads of swaps so that I can swap but also gift my project to new demonstrators and the SU team who have worked so hard to make our event so amazing.

In my post today I want to show you the Make and Takes we made and introduce you to the new 2025-2027 In Colours. Then I will show you the projects we made at the After Hours crafting session.

The 3 Make & Take Projects were featured the soon to be released Layered Thoughts Stamp Set and the Celebration Expressions Memories & More Card Pack.

There were 2 cards in our Make & Take pack. We were given one each of the two sizes of card bases and envelopes from the Basic White Assorted Memories & More Cards & Envelopes.

Both of the cards involved some tearing and stamping. Then we used the fine tip end of a Basic Black Stampin’ Marker to draw a box around the outer edges of the card front.

The banner was fussy cut and added to the card front.

GREAT NEWS – There is a new pack of 3 Journaling Pens coming in the new May 2025 – April 2026 Annual Catalogue!

The final Make & Take was a scrapbooking layout.

NOTE TO SELF – learn to take better photos of scrapbooking pages!

This layout is so bright and cheery. THe Gold Foil hearts and fussy cut banners finished the layout so well.

Friday night was our opportunity to continue creating. The After Hours was a ‘pay to play’ crafting experience. We were able to choose from two soon to be released new products – Impressions Abloom or Turtle-y Awesome. I chose the Impressions Abloom.

We had four projects to make.

We received the stamp set and the Greetings for All Mix & Match Ephemera Pack, a 12″ x 12″ cardstock pack, a 2025–2027 In Color Cardstock pack, and 2025-2027 In Colour Flat Pearls.embellishments.

The new 2025-2027 In Colours are: Cloud Cover*, Darling Duckling, Secret Sea, Strawberry Slush and Timid Tiger.

(* – Stampin’ Up! discovered a qulaity issue with the Cloud Cover Classic Stampin’ Pad and have decided to withdraw its availability until the problem can be resolved.)

The two cards both used a technique where the stamped card is cut and spread apart.

Then we had two scrapbooking pages to create.

This layout gave us the opportunity to create our own ‘DSP’ by stamping some of the Impressions Abloom images.

The sentiments, for both layouts, are from the Greetings for All Mix & Match Ephemera Pack.

And, they each have photo mattes and a journaling layer included.

I needed to place this layout on the a coloured background so that you could see it more effectively.

As usual, OnStage was an amazing experience – catching with friends, making new ones, seeing great presentations, learning more about ways to build my business and of course, getting to see the new catalogue and new products before anyone else! WIN WIN

In my next post I have some scrapbooking layouts to share with you.

Until then, happy stamping.

Posted on Leave a comment

FRIDAY IS ALL ABOUT FUN FOLDS – SO JOIN ME FOR SOME FUN!

As this post goes live, I will back at the Brisbane Convention & Exhibition Centre for Day 2 of OnStage. Around lunchtime, I will be helping out in the Product Playground. I have been delighted to be a volunteer at several OnStage events because it is a wonderful opportunity to contribute to the Stampin’ Up! community.

Today I have a Double Side Step Card to share with you and these are many of the products I have used.

This card style is another great one for showcasing the Designer Series Paper.

The cardbase was cut and scored using a piece of Azure Afternoon cardstock.

Then I cut panels of the DSP to fit within each of the cardbase panels.

The front of the card has been decorated with panels of the DSP while inside the card a Basic White panel was added.

The greeting was stamped and die cut before being added to the card front using Stampin’ Dimensionals.

Lengths of the Azure Afternoon twine were looped through the hole in the tag and trimmed.

The card insert and back of the envelope were decorated with the Designer Series Paper.

Then arrows and stars, from the Puffy On the Go Stickers pack, were added to the front of the card.

I love the new Strawberry Slusk colour and I can’t wait to see all the new 2025 – 2027 In Colours.

Tomorrow is the final day of OnStage and I amlooking forward to it.

I have no idea yet what I will have for next week BUT pop by because I am confident that you will be inspired.

Until then, happy stamping.

If you live in Australia, you can order any of the products I used to make this card by going to my online store. Just click on any of the images below.

These are most of the products I have used this week for my projects.

Product List
Paper Snips
[103579]
$21.00